
The print designer
Turning a timetable into something you can hand out — what it produces, how presets work, how to make a big grid fit a page, and how to print a signed letter.
A timetable on screen and a timetable on paper are different documents. Paper has a fixed page, no hovering, and whoever is holding it cannot filter. The print designer exists to make that second document properly rather than screenshotting the first.
Open it with Print from the timetable.
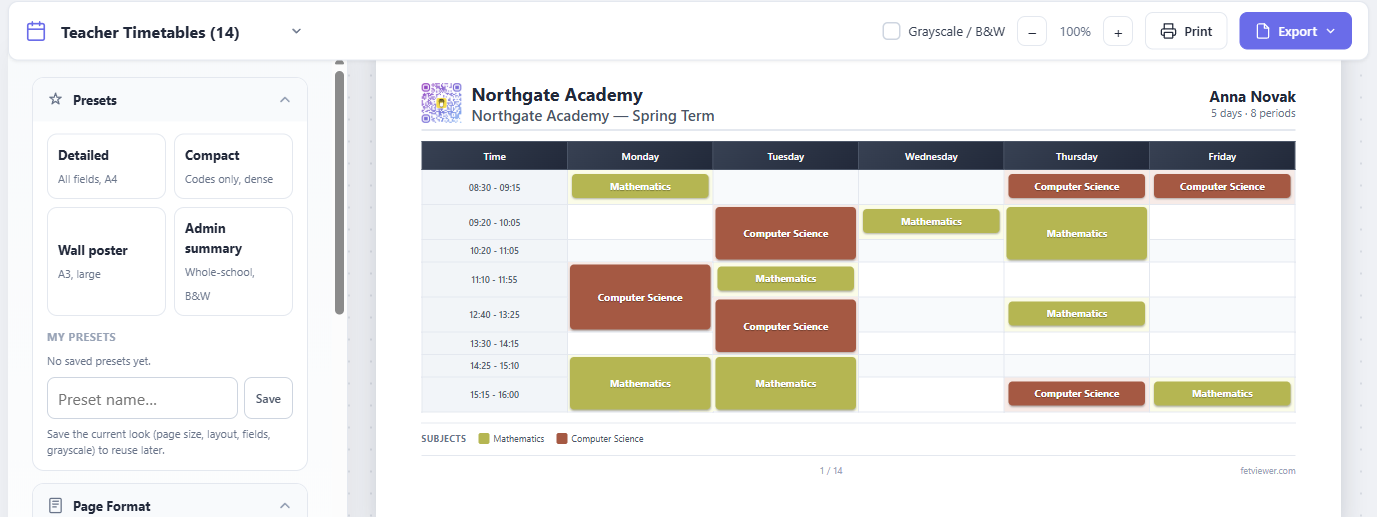
The designer: settings on the left, a live preview of the actual pages on the right.
What you are printing
The print type at the top of the page decides whose timetables you print: teachers, student groups, rooms or activity tags. The preview changes at once, so try more than one before you settle.
In Layout & scope, the Layout choice decides the shape. One sheet per resource gives one sheet for each teacher, student group, room or tag. Whole-school summary puts the whole school on one sheet.
The preview is the output
What you see on the right is not an approximation. It is paginated exactly as it will print, so a lesson falling awkwardly across a page break is visible before you send it to a printer rather than after.
Each page in the preview is one printed page.
Making it fit
The most common problem with a printed timetable is a grid slightly too wide for the paper.
Fit and fill measures the content and scales it to the page, and shows how much of the page you are using. That figure is worth watching: a sheet at very low utilisation usually wants a bigger font or a different page size rather than more shrinking, and one pressed against the limit will be uncomfortable to read.
Changing page size or orientation is often the better answer than scaling down — a wide grid on landscape A4 beats the same grid squeezed onto portrait.
Two or three sheets on one page
To use less paper, open Page Format and set Sheets per page to 2 or 3. Each sheet then gets smaller to fit its part of the page. All the sheets on one page get the same size. A dashed line shows where to cut. The preview shows each printed page as one paper, with its sheets on it.
The combined PDF export puts the same number of sheets on each page. A letter always prints on its own page.
A letter with signatures
Some schools give each teacher a signed copy of the timetable. To print one, open Letter with signatures and set Print as to Letter with signatures. Each sheet then becomes a letter to its teacher or student group.
From top to bottom, the letter has these parts:
- your header lines, for example the ministry, the region and the school;
- a From line;
- the word before the name, then the name of the teacher or student group;
- a Subject line;
- an opening sentence;
- the timetable;
- the student groups and the total hours;
- a place and date line;
- two signature boxes.
Type the header lines one time. Each line in the field is one line on the paper. A field that you leave empty does not print.
You can change every word that prints, including the text above the signature boxes. This lets you print the letter in your own language. If the letter is in Arabic, Hebrew or Persian, select Print the letter from right to left.
Presets
Once a sheet looks right, save it as a preset with a name. Presets carry the whole look — page size, layout, fields, colours, greyscale — so next term is one click rather than a reconstruction.
The built-in presets give a detailed A4 sheet, a compact sheet with codes only, a large wall poster and a black-and-white summary of the whole school.
Three built-in presets print a letter: Morocco — French letter, Morocco — Arabic letter and Turkey — MEB teacher sheet. They fill the letter with the usual words of that country. A built-in preset does not remove text that you typed yourself, for example your header lines.
Getting it out
Print goes straight to your printer. Export produces a file to send on or archive.
Greyscale is worth checking before a large run. A colour-coded timetable can lose exactly the distinction it relies on when it reaches a mono office printer, and the designer has its own greyscale switch so you can see that before the paper does.
Where to go next
- Choosing what goes on the page
- Printing real dates — a term calendar rather than a repeating week.